In this Pillars of Eternity 2: Deadfire Build Guide we’re going to be taking a look at the Brute Class, which is a mixture of Fighter and Barbarian. I’ll be providing information on Attributes, Weapons, Armor, and most importantly, what Abilities to take and how to use them. Please keep in mind that this is my Brute Build, and there are plenty of ways you can build this class, and this is not the only one. If you’re new to Pillars of Eternity 2, or you just love creating characters as much as I do, then this Guide is for you. Please note that this Build Guide was updated for the 5.0 version of the game, as well as 1.01 on console (as of January 20th, 2020), and works with both Real Time with Pause and Turn-Based.
Reaping Whirlwind Build
This Brute Build (Reaping Whirlwind) combines that fast and aggressive nature of the Barbarian with the steady, focused attacks of the Fighter. Combined you deal incredible single target damage, which ramps up as combat goes on, and you down enemies. With the 1.1.0 patch, many Builds were nerfed, however, this one still remains strong despite this. If you ever wanted to play a fiercely aggressive melee warrior, then try out the Reaping Whirlwind!
The Reaping Whirlwind Build focuses on one specific thing that both the Barbarian and Fighter class have in common; the benefits they gain for downing an enemy. Barbarians have ZERO Recovery Time when killing an enemy with Crushing Blow or simply killing an enemy after they have acquired Blood Thirst, which allows them to attack again and again. Fighters strike a nearby enemy with a Full Attack while using Cleaving Stance, and when you combine these two things you create a machine that only gets stronger and stronger. Because, each enemy downed only fuels them to kill the next, all the while weakening enemies with Carnage which inches them closer to death. Note that if you’re playing Turn-Based you should use Barbaric Smash instead, since you will not gain extra attacks in this game mode.

Reaping Whirlwind Subclasses (Devoted and No Subclass)
For Fighter I chose Devoted for the increased Crit Damage and Penetration. Penetration is something that you can never get enough of, but Devoted requires you to use a specific weapon type or face an Accuracy penalty. If you aren’t sure which weapon you want to use, you can choose Tactician, to get the Brilliant Inspiration when all enemies are Flanked. Use a Cipher with Phantom Foes or Tekehu /any Wizard to achieve this with the Chill Fog spell.

For Barbarian I chose No Subclass although you can play as a Berserker. It really depends on how your party is setup, and how many people will be in melee range to take damage from Carnage. However, if you play solo definitely take the Berserker Subclass for the increased Penetration, Armor and Crit Chance. Additionally, you can use the Devil of Croc Breastplate to nullify the Confused Affliction, but it may not be in your game depending on what save state you have from the first.
Reaping Whirlwind Weapons and Armor
I decided to got with Battle Axes for my weapons here, for similar reasons I did with the War Caller Build. They give increased Crit Damage and they also put a Raw Damage bleed on enemies when they strike, which helps to soften up targets, especially hard to kill ones. You can really use any weapon type you wish, but I would recommend selecting One-Handed Weapons and ones that deal the most damage per Hit. This is because Crushing Blow and Penetrating Strike are both Full Attacks and perform better when Dual-Wielding. This is also because you will have no Recovery Time often, so you don’t need Weapons with faster Recovery Time. The hardest hitting One-Handed Weapons are Sabers, Swords, Battle Axes and Spears.

When it comes to Armor you can really use any you wish. You’ll start out slower with Heavier Armor, but once you get into combat a ways it won’t matter much. I generally like to use Light Armor, but if you’re playing a Berserker I would definitely consider Medium or Heavy. No matter what you choose, look for Armor with the highest overall Armor values so that you don’t get penetrated to death…
Brute Abilities
In this section we’re going to cover the “must have” Brute Abilities for this Build. You are free to pick and choose which you want outside of these because everyone’s style of play is different and there is no perfect way. However, these ones will be needed for this Build to work effectively.
Fighter Abilities
 Disciplined Barrage – This ability increases our Perception, and converts 50% of Grazes to Hits. Between this and Confident Aim you will almost never have to worry about connecting with attacks.
 Fighter Stances – These Stances become available at level 4 and you want to get them ASAP. Cleaving Stance is amazing with this Build so you’ll want to use it as much as possible.
 Confident Aim – This passive also helps to convert Grazes to Hits, and allows us to get away with lower Perception.
![]()
![]() Two Weapon Style – This passive decreases your Recovery Time, further increasing the speed you attack. You won’t need this if you’re playing Turn-Based.
Two Weapon Style – This passive decreases your Recovery Time, further increasing the speed you attack. You won’t need this if you’re playing Turn-Based.
 Disciplined Strikes – This upgrade of Disciplined Barrage increases the likelihood that you will Crit by 25%, which helps increase our overall damage. It synergizes well with Crushing Blow, which increases Crit Damage by 50%, and Battle Axes which provide +20% Crit Damage.
 Penetrating Strike – This ability is your bread and butter attack when you begin combat. You want to use this until you get enemies low on Health and then use Crushing Blow to finish them off.
 Rapid Recovery – This upgrade of Constant Recovery really helps to keep you alive while in combat and is just an all around good use of an ability point on any Fighter.
 Weapon Specialization – This passive will further increase our damage with Battle Axes or your chosen weapon type.
 Mob Stance – This stance will upgrade Cleaving Stance so that you gain even further reduced Recovery Time for each enemy around you. You’ll absolutely want this one, because it will help you attack lightning fast, but only if your playing Real Time with Pause.
 Uncanny Luck – This ability gives you a small chance to resist damage or Crit, and we need both. Take it when there is nothing else worth getting.
 Armored Grace – This ability will reduce the penalty you take to Recovery Time when wearing Armor. This will allow you to wear Light Armor with almost no penalty, but is really only good for Real Time with Pause.
Improved Critical – This passive will further increase your Crit Damage, and you will be doing plenty of Crits so it helps.
Weapon Mastery – Another passive that increases damage so we pick it up. You can never have enough passives that do this, and Fighters possess many, which is great.
Barbarian Abilities
 Frenzy – We use this constantly to buff our Action Speed, helping to increase our overall damage output. Take it during Character Creation.
 Barbaric Blow – This ability gives you a high damaging attack with a +30% Hit to Crit chance and increased Crit Damage. Works amazing with two weapons. the
 Bloodlust – This passive increases your Action Speed when you kill an enemy, further increasing your overall damage, so we grab it.
 Bloody Slaughter – This ability helps us to ensure we finish off targets with Crushing Blow, resulting in a free attack.
 Unflinching – This ability is great at preventing some Afflictions that would disable you. Get this one when you have a spare point.
 Blood Frenzy – This makes our Crits cause Raw Damage bleeding on enemies hit, which will be often.
 Crushing Blow – This upgrade of Barbaric Blow allows for faster attacks by eliminating the Recovery Time you have if you kill the target. Once you start getting free attacks with this, you will start creating a loop of free attacks that destroy enemies.
Brute Force – This passive allows us to target Fortitude if it is lower than Deflection in order to gain better Accuracy. This is great at increasing the likelihood of a Crit.
Blood Thirst – This removes your Recovery Time when you down a target. This does stack with Crushing Blow, so if you kill an enemy with Crushing Blow you will get 2 additional attacks immediately. However, it isn’t as useful in Turn-Based because you won’t get an extra attack, you’ll just go first next round.
Blood Storm – This upgrade increases the Duration when you kill an enemy which synergizes nicely with this Build. We want to cast Frenzy once and use all 8 other points on Crushing Blow, so we take this.
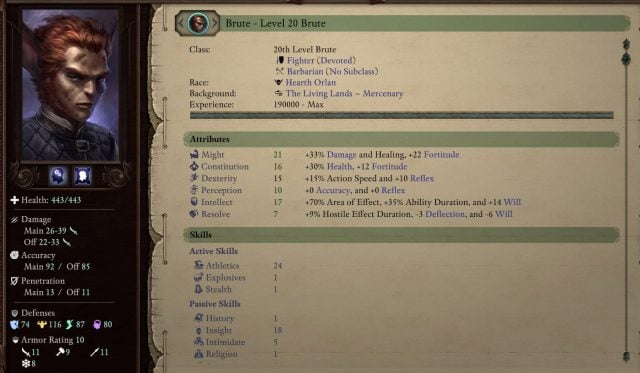
Reaping Whirlwind Attributes
In this section we’ll cover Attributes for the Reaping Whirlwind Build, and explain a bit about each and why we need it or why it’s important. Brutes need Might, Intellect and Dexterity, with a dash of Constitution. They can dump Resolve and leave Perception untouched or perhaps dump it a bit for extra points. This is because Disciplined Barrage and Confident Aim make it so all you really have to do is Graze in order to Hit, which doesn’t require much Accuracy. However, if you’re playing Turn-Based you will not want to spend points in Dexterity, but instead place them into Perception and Might.
 Might helps with the damage we deal on each Hit, and even though ~ +25% or so doesn’t seem like a whole lot, you will get this on each swing from both Weapons, so if you’re duel-wielding it’s more like +50%. You need to get kills quickly in order to get to slaughtering, so you want each swing to strike as hard as possible. I’d max this out or close to it.
 Intellect not only helps with the Duration of Disciplined Strikes and Blood Storm, but also increases the AoE size of Carnage as well as the cleave from Cleaving Stance. We need Blood Storm to last as long as possible so we can use all our Rage for Crushing Blow, so it’s a must here. 15 or so points is good.
 Dexterity increases our Action Speed, which is good for getting more attacks. We don’t get Blood Thirst until much much later in the game, so we’ll be relying upon Crushing Blow for extra attacks early on and our quick Action Speed. 15 or so points is good.
Final Tips
This Build starts out slow in combat because everything is at full Health. You’ll begin combat by buffing with Blood Storm and then Penetrating Strike your first target until it is weak and then use Crushing Blow to finish it off. This will grant you an additional attack with Cleaving Stance, and 0 Recovery Time on your next attack (your next 2 attacks if you have Blood Thirst). This should allow you to finish your next target quickly, granting another cleave, repeating this process. All the while enemies around you are getting weaker and weaker due to Carnage, making you attack faster and faster…like a Whirlwind. If you are playing Turn-Based then you will not attack this fast, but enemies will get weaker and weaker around you, and since you’ll likely go first every round you can kill enemies before they get a turn.

I really like Hearth Orlan for this Build for increased Hit to Crit chance. Increasing your Crit chance synergizes really well with Crushing Blow and Battle Axes, and 10% is a good amount, which also applies to Carnage damage. Human is also a decent choice, as you will be Bloodied often and extra Damage is good.
When looking for gear, keep an eye out for anything that will increase your overall damage, so things like Might, Crit Damage, Crit Chance etc. You’ll want to prioritize those things. In addition, there are many good weapons that can further increase the effectiveness of this Build so you want to learn what those are and get them as early as you can. Magran’s Favor for example is just beastly with this Build, but there are others that work well too.

You can make a similar Marauder Build by choosing Rogue instead of Fighter. You will lose access to the cleave when killing enemies, but you will gain the ability to Riposte for a Full Attack on enemies that Miss you in melee combat, and the bleed from Arterial Strike can speed up killing enemies with higher Health. In addition, if you chose Streetfighter you will gain further reduced Recovery Time, Sneak Attack damage and Critical Damage (when Flanked and Bloodied). Your biggest issue though will be increasing your Deflection to the point that you are missed, which is hard to do on higher difficulty levels, and Frenzy reduces it by 10.
Stay tuned for more Pillars of Eternity 2 Build Guides through out June, as we make some more specific Guides covering some of the most fun and interesting combinations we could find. If there is a specific combination you would like to see, please post in the comments and we will do our best to accommodate!
Log in to leave a Comment