Diablo 4 Bleed Barbarian – Lvl 50 Barbarian Build Guide: In this Diablo 4 Barbarian Class Build, I’ll show you how to play a Lvl 50 – Rupture Barbarian, which continues our beginner Diablo 4 Rend Build for the Barbarian. This build stack up bleed damage on enemies and then rip them apart creating a blood explosion, if you’ve been looking for a bloodbath build then this Diablo 4 Rupture Build guide is for you!
Diablo 4 Bleed Barbarian Build – Rupture
This Diablo 4 Bleed Barbarian takes from where our Beginner Bloody Barbarian Build left and make the necessary adjustments to be able to effectively clear Tier III content. We’ll not only be swapping out some skills, but the overall way the build play changes as well (Don’t worry, you’ll still be bleeding out your enemies to death).
This is a very fun Diablo 4 Bleed Barbarian to play, that requires you to constantly engage with different combos and to adjust your strategy depending on what’s happening on the battlefield, allowing it to remain fresh even after a long play session.

First, you’ll notice that we are not using any Basic Skills to generate fury (except while fighting bosses). Instead, we are using a combination of Leap and Ground Stomp to start off engagements. This will generate enough fury to get Rend Going as well as creating two pair of earthquakes that deal physical damage, and provide both Increased Damage and Damage Reduction.
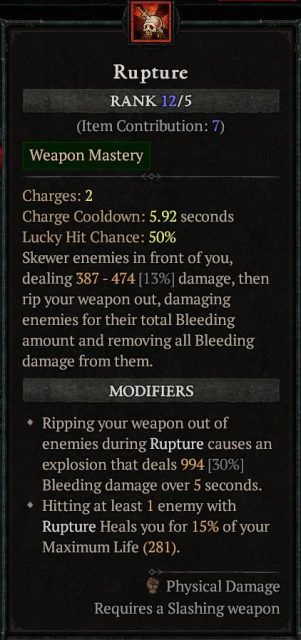
While enemies are stunned, we’ll use Rend and start applying bleeding until their bar is almost full. Then, we’ll use Rupture to instantly consume the remaining bleeding on them. Rupture will heal us for 15% of our max health, and create both a blood explosion and a blood pool, both dealing even more bleeding damage to any remaining enemies.
For big groups of enemies, we’ll use Challenging Shout to reduce incoming damage and further boost fury acquisition, while we keep Iron Skin as a last resort option for when we are crowd controlled or really low on health.
Diablo 4 Bleed Barbarian – Skill Distribution
As I previously mentioned, we’ll need to swap some skills to make this work on Tier III, as we won’t be able to maintain Fury generation just by smashing enemies with Death Blow. We’ll also be getting some passives to boost our bleeding damage as well as increasing our Survivability, as enemies hit much harder later into the game, and we’ll be standing right in front of them while we bathe in their blood.

Active Skills
Flay
For starters, we are going to take out Frenzy and take Flay instead. You’ll only use Flay during Boss Fights, as your regular Leap combo won’t generate enough fury. The added bleed damage in combination with Battle Flay which further boost our regular attacks is perfect to make up for that. To swap from Leap into Flay before a Boss Fight, simply open the Skill Menu and replace them on the fly. Notice that this doesn’t require any type of respec, you have both skills, you are simply swapping them.
Rupture
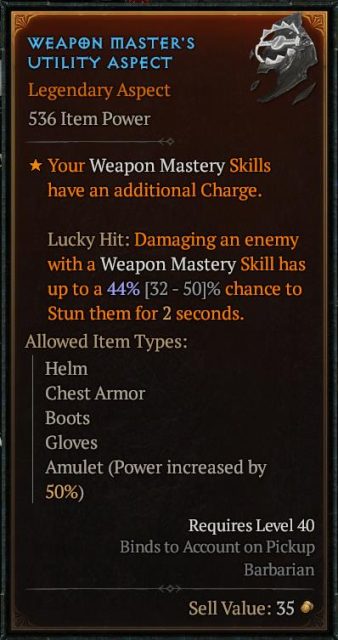
We are also going to remove Death Blow to make space for our main skill, Rupture. The main thing about Rupture, is that it gets its cooldown reduce by each point you assign into it. This is further reduced by the Fields of Crimson Unique, which gives us even more cooldown reduction, in combination with many +Rupture levels. To make it even better, we’ll be using the Weapon Master’s Aspect which gives us 1 additional charge, allowing you to use it twice in rapid succession or to space it out but keep constant uptime.
Leap and Ground Stomp
Leap and Ground Stomp synergize amazingly thanks to a series of combos. For starters, the Aspect of Perpetual Stomping allows you to reset Leap cooldown after using Ground Stomp. This will allow you to Leap, Stomp and have Leap available right away either for either repositioning, or to generate more fury.
The second combination is achieved by equipping both the Aspect of Bul-Kathos and Earthquake Aspect. Aspect of Bul-Kathos creates an earthquake that deals damage over time and increases damage reduction, while the Earthquake Aspect also creates an earthquake that deals damage over that and increases damage output. The great thing is that you’ll get both bonuses while you stand on any earthquake, meaning that by just using either Leap or Ground stomp you’ll get both Increased Damage and Damage reduction.
Passives
Monsters hit much harder as you progress towards higher levels, and you’ll need more health as well as damage reduction. Imposing Presence boosts your health by a massive 15% (which works great with the Max Health heal from Rupture), while Martial Vigor and Pit Fighter increases damage reduction.
To increase our damage, we’ll start by getting the Gushing Wounds Key passive. This makes it so bleed has a critical chance. When a critical strike happens when applying bleed, that amount will be increased in proportion to your Critical Strike damage, greatly increasing the amount of bleeding we apply. Thanks to this, we’ll be able to take advantage of the No Mercy and Heavy Handed which
In addition, overpowering will create a blood explosion similar to Rupture.
Another great combo is by using Expose Vulnerability, which allow you to apply Vulnerable to everything by using Rend after a Rupture attack. For this reason, you’ll also want to assign points into Cut to the Bone which increases our bleeding damage against vulnerable targets.
| LEVEL 50 Rupture Barbarian SKILLS | |
| Skill | Points Spent |
| Flay | 1 |
| Enhanced Flay | 1 |
| Battle Flay | 1 |
| Rend | 5 |
| Enhanced Rend | 1 |
| Furious Rend | 1 |
| Ground Stomp | 5 |
| Enhanced Ground Stomp | 1 |
| Tactical Ground Stomp | 1 |
| Iron Skin | 1 |
| Enhanced Iron Skin | 1 |
| Tactical Iron Skin | 1 |
| Challenging Shout | 3 |
| Enhanced Challenging Shout | 1 |
| Tactical Challenging Shout | 1 |
| Imposing Presence | 3 |
| Martial Vigor | 3 |
| Leap | 1 |
| Enhanced Leap | 1 |
| Power Leap | 1 |
| Rupture | 5 |
| Enhanced Rupture | 1 |
| Fighter’s Rupture | 1 |
| Pit Fighter | 3 |
| No Mercy | 3 |
| Expose Vulnerability | 3 |
| Hamstring | 1 |
| Cut to the Bone | 3 |
| Heavy Handed | 3 |
| Gushing Wounds | 1 |
You’ll want to leave maxing out “Ground Stomp” and “Challenging Shout” for last. Maxing out Ground Stomp decreases its cooldown, while Challenging Shout increases Damage Reduction, both things can be saved for last when optimizing skills.
Weapon Expertise and Technique
You’ll be using Fields of Crimson for this Diablo 4 Bleed Barbarian, meaning that its expertise will give you 20% of direct damage inflicted as Bleeding damage over 5 seconds, as well as x30% increased Bleeding damage for 5 seconds after killing an enemy.
Make sure you are using your Slashing Weapon for both Rend and Rupture.
For the Weapon Technique, you’ll want to take the Two-Handed Axe, which increases damage to Vulnerable enemies by x15%.


You’ll be constantly killing bleeding enemies, so you’ll get full use of the expertise, and the vulnerable effect applied by the Expose Vulnerability passive allows us to take advantage of the additional vulnerable damage.
Diablo 4 Bleed Barbarian – Equipment, Gems and Aspects
Most of our combos are acquired through combining different aspects, so you’ll want to focus on getting as many as possible before transitioning into this build. The Barbarian has 12 Equipment slots, and it’s easy to get overwhelmed on what you should keep or replace while leveling up, as you’ll be constantly updating your gear.
Codex of Power Aspects
As previously stated, you’ll be constantly updating your gear as you increase in level. If you only rely on extraction you’ll find yourself out of options very fast and some Aspects are very important to keep the Diablo 4 Bleed Barbarian going. For this reason, I strongly recommend that you clear the Dungeons associated to the following Legendaries to unlock its codex of power, which will grant you a reliable way to imprint them while leveling up
Resource
- Aspect of the Umbral – Champion’s Demise, Dry Steppes: Perfect for generating a burst of fury when using Ground Stomp on a pack of enemies.
- Slaking Aspect – Maulwood, Fractured Peaks: This helps with fury generation when dealing with waves of enemies.
Utility
- Aspect of Anemia – Kor Dragan Barracks, Fractured Peaks: Has a lucky hit chance to stun bleeding enemies for 2 seconds. Synergizes perfectly with our bleeding and the other Stun effects.
Mobility
- Aspect of Perpetual Stomping – Charnel House, Dry Steppes: This aspect allows you to reset Leap’s cooldown by using Ground Stomp. This is crucial to make the Diablo 4 Bleed Barbarian work, so get it as soon as possible.
Offensive
- Aspect of Retribution – Abandoned Mineworks, Kehjistan: This aspect proportionally increases your damage against stunned enemies. You should equip it on your Amulet for 50% efficiency.
Defensive
- Aspect of Bul-Kathos – Light’s Refuge, Hawezar: Makes it so Leap creates an earthquake where you land, dealing damage over time. Standing on earthquakes will provide you with Damage Reduction.
- Aspect of the Iron Warrior – Carrion Fields, Dry Steppes: This will be your only Unstoppable mechanic, so make sure to get it as soon as possible. It’ll give you increased damage reduction while Iron Skin is active
- Iron Blood Aspect – Forgotten Ruins, Kehjistan: This is great to deal with a big pack of enemies, providing damage reduction in proportion to the amount of bleeding enemies near you.

Lucky Drop Legendary Aspects and Unique Weapon
The following aspects cannot be obtained by completing Dungeons, and can only be extracted from Legendary Equipment that you find during your play through and then imprinted into your own equipment. Make sure to keep any additional that you find, so you can re-imprint them as you progress further.
Great
- Fields of Crimson – Unique Weapon: This is the best item for this Diablo 4 Bleed Barbarian, greatly increasing Rupture’s capabilities. The +Rank and reduce cooldown work tougher, greatly reducing the time it takes to recharge the skill. The unique blood pool effect works amazing both against bosses and packs of enemies, greatly enhancing your bleeding damage, which is further boosted by its other 2 affixes. While you can still make the build without this weapon, finding it will make a huge difference.
- Weapon Master’s Aspect (Offensive): Your Weapon Mastery Skills have an additional Charge. Lucky Hit: Damaging an enemy with a Weapon Mastery Skill has up to a [32-50]% chance to stun them for 2 seconds.
- Aspect of Encroaching Wrath (Offensive): After spending 100 fury (3 rend attacks), your next Rupture will deal 82% ~ 100% more damage, providing an immense damage boost. This is doubled when slotted into your two-handed weapon. Make sure to slot it into your Two-Handed bludgeoning weapon, as you won’t be able to slot it into your Fields of Crimson. This is important, because if you slot it into your Two-Handed Slashing weapon you’ll have to re-slot it, and since it’s an extraction only Aspect you might not have that chance.
- Skullbreaker’s Aspect (Offensive): Similar to rupture, this will cause damage based on the total bleeding when you stun an enemy, but it won’t consume the bleeding. You can stun enemies with both Ground Stomp and Aspect of anemia, synergizing perfectly.
- Earthquake Aspect (Offensive): This allows Ground Stomp to create an earthquake that deals damage over time. Standing on Earthquakes increases your damage.
Where to Slot Aspects
Most aspects can be slotted into multiple equipment pieces, so here is a guideline of what I used during my gameplay:
- Two Handed Weapon 1 (100% Increase): Aspect of Encroaching Wrath
- Two Handed Weapon 2: Fields of Crimson
- One Handed Weapon 1: Earthquake Aspect
- One Handed Weapon 2: Skullbreaker’s Aspect
- Helmet: Aspect of Anemia
- Chest: Aspect of Bul-Kathos
- Gloves: Weapon Master’s Aspect
- Waist: Aspect of the Iron Warrior
- Boots: Aspect of Perpetual Stomping
- Amulet (50% Increase): Aspect of Retribution
- Ring 1: Aspect of the Umbral
- Ring 2: Slaking Aspect
Equipment Affixes
The amount of damage you deal is strictly related with your equipment, as it proportionally increases your damage. Thanks to the bleeding, vulnerable and slow, you’ll be able to stack up more affixes than other Diablo 4 Bleed Barbarians, so use this to your advantage. When comparing an item, try to calculate the combined % of damage increase you are getting from all affixes, instead of just looking into DPS.
You should search for the following affixes:
Damage
- Damage with Two-Handed Slashing Weapons
- +Rank Rupture, Rend and other Skills
- Damage to Bleeding Enemies
- Damage Over Time
- Damage to Slowed Enemies
- Core Skill Damage
- Physical Damage
- Damage to Stunned Enemies
- Damage to Close Enemies
- Vulnerable Damage
Defense
- Damage reduction from close enemies
- Maximum Life
- Damage Reduction

Gems
For gems, you’ll want to slot:
- Weapon: You should slot Amethysts for increased damage over time.
- Armor: You should use Rubies to boost your maximum life, which will further increase Ruptures heal.
- Jewelry: Try to compensate for any resistances that you are lacking. If you feel strong enough, just use Skulls to further boost your armor.
Paragon and Glyphs for Barbarian Build
When you reach lvl 50 you’ll unlock the first Paragon Board, and you’ll start earning Paragon Points. On the first Board for this Diablo 4 Whirlwind Barbarian Build you should first focus on the right part to get the “Brawn” rare node which further increases your damage and gives you maximum life. From there, continue up and get the “Socket” and the two other rare nodes.
If you happen to find it, you should slot the “Bloodfeeder” Glyph into the socket which increases damage against bleeding enemies, and try to allocate at least 25 Dexterity around it. This will activate the additional bonus, increasing critical strike chance against bleeding enemies.
Try to get as many “Strength” nodes as possible, but also make sure to fulfill the socketed glyph requirements on its radius to acquire its Additional Bonuses.
Once you reach the top, you will have to decide what Paragon Board to go for. I recommend the “Blood Rage” board, as its legendary node will grant you an easy way to acquire Berserking.
Once you have enough points, make sure to find a socket that fits the requirements for the “Disembowel” glyph, as its additional bonus will greatly increase the uptime of the Diablo 4 Bleed Barbarian.

Final Tips
Remember to replace Leap with Flay before fighting a boss. This will help you with fury regeneration and increase single target bleeding damage.
While traveling through the dungeon, you can use leap to move faster, and use ground stomp against random enemies to reset its cooldown, but only do this if you are not expecting a fight soon as your ground stomp will be on cooldown.
If the enemy dies before you rip your weapon out while using Rupture, the explosion won’t take place, so make sure to use it with enough time and always aim for bigger enemies.
Make sure you upgrade your Fields of Crimson, as it’ll provide you with more Rupture levels and increased cooldown reduction.
Try to wait until you are low on health to trigger Iron Skin, as this will greatly increase its barrier efficiency
When engaging enemies, go for elites first, and make sure that your ground stomp stuns them to maximize damage against them.

While the Codex of Power is very reliable, it will always imprint the lowest version of the Legendary Aspect. Make sure to check the Legendary drops you find, as these might be the same as you are using but with better rolls.
Be sure to check out our Diablo 4 Wiki for any other questions you have about the game and the Builds page if you are looking for more Diablo IV Builds, as well as our Getting Started Guide and Best Class to Play if you are looking for more Diablo 4 content!
Log in to leave a Comment